Everyone likes to make cool and unique presentations. You can make your presentations unique by inserting some cool youtube videos related to your project. But how to do that?? Here we have the answer.You can easily embed youtube videos in your PowerPoint Presentations by installing this plugin.
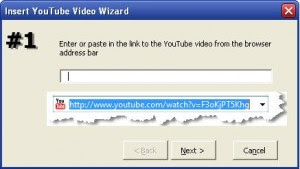
After downloading and installing this plugin go to insert in menu bar. Select “insert YouTube Videos”.
Insert youtube videos in powerpoint presentation
Copy and paste the youtube video link in the textbox. Set the options as needed. And done. Now play your presentation and see if it is showing the video or not. You will require internet connection at the time of presentation or else the video won’t load.
For PowerPoint 2003 and earlier versions Download Here
Now you can create your own text to speech converter software to make your computer speak whatever you type. I found this script on some Vietnamese site. It’s pretty cool. Just run this script and make it read any funny sentence.Copy the code given below in notepad and save it as anyname.vbs. Make sure that you save it as .vbs file.
Dim message, sapi message=InputBox("What do you want me to say?","Speak to Me") Set sapi=CreateObject("sapi.spvoice") sapi.Speak message
After making a vbs file just double click on that file and type anything you want in the text box.
Tags: Computer Tricks, Computer Trick, Cool Computer Tricks, Pc tips and tricks, Pc trick, Tricks
ATI tv wonder usb digital hdtv tuner, Today we have another exciting and sophisticated technology to share it with you this time we have the ATI TV Wonder USB HDTV Digital tuner and this unit will be on your pc and laptop and benefits.
The best thing is probably portability, is very smart and slim , you can even go for a walk with him. The great ATI TV Wonder HD 600 USB HDTV tuner as a USB 2.0 Flash Drive.
The main tasks performed are making you able to record and watch, schedule and more options and actions HDTV by PVR. It has capacity to make your TV shows into DVDs and the OTA Digital TV and HDTV record you can do it, as well as cable TV.
Apart from the ATI TV Wonder USB Digital HDTV tuner, you will have S-Video connection, composite video and audio Ports and the free device F-type coaxial RF connector , Cost and beyond all these things, a remote control of 24-button is put in for you nad yo help you use it with the best way.
The first and most important function of the ATI TV Wonder USB Digital HDTV tuner, it designed slim and portable and smart. It is not even a box-shaped device, like the many television receivers.
Runs on USB 2.0 port and you can use your laptop to a TV, the device lets users watch, record and pause ,all the favorite TV programs, and movies and more.
Password Protect USB Password Protect USB is a software program designed to protect an unlimited number of folders with your personal passwords. To protect your information, you do not have to move all your files to a special secure folder; you can set a password on any folder containing your sensitive data.
The first time you need to run Password Protect from the installation directory. After that, you can simply right-click the folder in Windows Explorer and select Lock With Password Protect USB from the right-click menu.
You can protect folders on your hard drive, USB external and removable drives. If you install Password Protect USB right on your removable drive, you can protect/unprotect folders at any computers your drive is connected to. To unlock your folder, you do not need to run the program: just double-click the folder in the right pane of Windows Explorer and enter your password.
Password Protect USB supports Windows XP, 98, 2000, NT, ME, Vista. It is very user-friendly and easy to use.
It takes a powerful machine to run the latest games available in the market. If you have too many processes running in the background then your game may start taking hiccups. To avoid this performance problems one require to stop the unwanted processes and close all the unneeded programs.
Game Booster can do all the things for you. It is an application which is dedicated to game lovers. It helps to improve your gaming experience. It can save a lot of time of your by stopping all unneeded programs and services on a single click of your mouse.
Game Booster also optimize your primary memory for better gaming experience. In short it automates the process of optimize PC for gaming.
Once you enter the gaming mode it finds all unnecessary processes and temporarily disables them. When you switch back to normal mode it will start all the services which were disabled previously.
Yes it's true Motorola Droid is going to kill Iphone. Its a smart phone which everyone would like to have. Motorola Droidis the first mobile device developed in partnership with Google to feature its next-generation open Android platform. Motorola Droid redefines the smart phone becoming the first device built with Android 2.0. On Droid you will experience a PC-like browsing experience on a mobile device that has a massive high-resolution display, the thinnest touch QWERTY slider available, and twice the speed of the leading competitor that is Iphone 3Gs. Motorola Droid takes the search that Google is known for to the entire phone, going deep into your phone and all of your applications. The more you search, the better Droid gets to know you and the quicker you get the information you need.
Droid shatters the standard mobile web experience with high-speed, high-resolution browsing expected from a PC, now in a sleek mobile device. Its industry-leading 3.7-inch display provides the best view of Websites and conveniently zooms with a double tap for faster navigating. Equipped with a powerful processor, Flash and full HTML browser, Droid delivers Web pages, 3D graphics, videos and more up to two-times faster than other devices, all in beautiful 16-million color high-definition. Google Chrome bookmarks can also be synched between the device and PC, making favorite sites easier to access when mobile.
Droid uses one-step Google tools to bring timely and relevant info to the homescreen without the need to dig through multiple Web pages, search boxes or menus. Searches can be typed or spoken, and results are brought from both the Web and phone content such as contacts, music, photos and applications. Contextual search is also used for offering location-based recommendations, so getting around is made even easier.
Google also makes navigation smarter on Droid, with spoken turn-by-turn directions and complimentary Google Maps. Consumers can keep up with and find local friends using Google Latitude, or get a bigger picture with a brilliant satellite viewpoints of Google Earth. Droid can also be used as an in-car navigation device with a special mount to help explore without getting lost.
With the world's thinnest QWERTY slider, Google Synch, text-to-speech, push email for multiple accounts and copy and paste functionality, Droid is designed to get the message out quickly so the flow never stops.
Droid offers premium multimedia features and a unique docking station for transforming into a bedside clock, movie player or digital picture fram. Its 16:9 high-resolution, widescreen frame is ideal for watching Web clips or downloaded videos, and a DVD quality video recorder features one-touch playback and YouTube upload over 3G WiFi. A built-in 5 megapixel camera with dual LED flash has the capabilities of a dedicated digital camera thanks for extras like Auto Focus and zoom. Users can store up to 16GB of content on-board or insert a memory card for up to 32GB.
Droid intelligent plug ins enable the phone to remember what you downloaded and is smart enough to access what you like best even when the app isn’t open. You can also discover thousands of apps and widgets from Android Market and even those that have been optimized for your phone at the Motorola Applications Store.
Droid is targeted at users who seek to communicate success and connect to their world. Living at a fast pace, taking risks and embracing change, Droid users are more likely to have and be excited by the latest technology, and are willing to try advanced handsets and new mobile applications, particularly those that help them manage their fast-paced lives. Droid is for consumers looking for an ultimate web browsing experience.
Droid is one of the first devices built with Android 2.0 and is packed with premium specs, and allows you to enjoy the web the way you've always wanted to with its large screen coupled with the power of the new Google 2.0. Droid is the thinnest Qwerty-slider on the market (13.7mm) with full-touch, wide-screen, high-res, brilliant 3.7 display and dedicated browsing keys on the Qwerty keypad.
Motorola Droid sets a new standard for the smart phone. The power of Web search takes on a whole new meaning, going deep into your phone and all of your applications. Motorola Droid takes the search that Google is known for to the entire phone. Type or speak your search with voice command, and not only will you get results from the web, but also anything you have on your phone contacts, music, photos, applications and more. Not more digging into menus and contacts to find what you need, it's all available from the home screen. Let work and life co-exist in harmony with work and personal email pushed diretly to you.
Well there is an application to serve the purpose.....
About Application : > Application Size = 208 KB > It checks the Internet Speed from a Calcutta Server > Downloads a 128 KB of Sample Data > It calculates your internet Speed for you
Requirements for Bandwidth Meter : > Windows 2000, NT, Xp, Vista or higher > For Windows Xp, NT, 2000 .Net Framework 2.0 or higher (Vista has it preloaded) > Internet Explorer Installed
To download Bandwidth Tester just copy the following address in your web browser without quotes.
boot.com is a virus which attacks the hard drives & the hard drives could not be opened by double clicking. Most anti virus programs are unable to virus clean up and even if they do, in most cases they are unable to delete viruses, only quarantine it. Here are some steps which can help you out toremoveboot.comvirus from your hard drives.
In hard drives after enabling viewing hidden file u can see some autorun file & a file named boot.com which cannot be removed just by deleting.
Here’s the REAL way to clean this off your system.
You should do these steps after a rebooting computer in safe mode.
1) Navigate to the problem drive(s) via the Explore option.
2) Click on TOOLS - FOLDER OPTIONS
3) Click the button which says ‘Show hidden files and folders.
4) UNCHECK the following boxes
Hide extensions for known file types
Hide protected operating system files
5) Find and delete the autorun.ini file and the recycled folder on the root directory of all virus infected drives.
6) Check “c:\windows\system32\dllcache” for boot.com virus file and delete it if present.
7) Check “c:\windows\prefetch” for boot.com file and delete if present.
8) Delete all files from c:\windows\temp (Some files may not delete, that’s OK, they’re in use by the system and not virus files.)
9) Delete all files from c:\Documents and Settings\[USER PROFILE]\Local Settings\Temp (Again, a couple files may not delete, don’t worry.)
10) Run Regedit
11) Make sure you are at the very first entry of the registry hive. (My Computer should be highlighted) then click EDIT - FIND
12) Search for “boot.com”. If it finds an entry, delete it. Keep hitting F3 until you’ve deleted all instances of boot.com in the entire registry.
13) Scroll the left column back up to the top and highlight the My Computer again at the top of the registry hive.
14) Click Edit - Find again and search for ‘recycled’ and repeat as in step 13, deleting the entries as it finds them.
15) Close registry editor and try opening the infected drives.
Now You are Done kindly let me know if you are still having some problem.
You’ll notice this effect at the end of the day. When you first turn on your PC it’s running smoothly, by the end of the day slows down. Yes, you can get various Software Applications to solve this. May of which costs but when free things matters, here is how a simple Windows Tweak can work (in both XP and Vista)
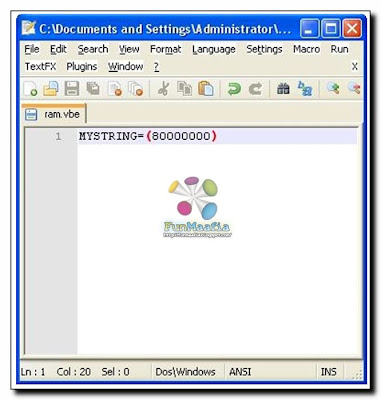
1. Open up Windows Notepad (I use Notepad++, review coming soon)
2. Type in MYSTRING=(80000000)
3. Save the file as MEMORY.VBE (or RAM.VBE if you like…just remember the .VBE)
4. Make sure you save the file to your DESKTOP.
5. Just double-click the newly created file on your desktop whenever your PC seems to slow down. It will give your RAM a much needed Boost.
Not that if you have less than Ram Memory 128mb (do you really? If so then Oh! wake up you need a Memory Upgrade. (Ram Upgrading will make your PC a lot faster) change the 80000000 to 160000000 and it should work the same.
RAM Defrag is nice Freeware Software utility that frees up your RAM however it clears of all the injected DLL’s and the Cache so the Computer may get more sluggish for a while a Defrag.
Liked the Trick, I hope you wont mind in wasting 20 seconds and writing me a comment below. Thanks for that !
Hard Drive Recovery or repair is almost a misnomer. Once a hard drive begins to fail nothing can stop it. There are, however, options that may save your data's life.
Common Causes/Symptoms of Data Loss in HDD Drives
• Computer won't boot • Inaccessible drives and partitions • Applications that are unable to run or load data • Corrupt files/data • Bad sectors • Virus Attack • Hard disk drive component failure • Hard Drive Crash • Fire or water damage • Media surface contamination and damage • Accidental reformatting of partitions • Accidentally deleted files
Basic questions which needs to be answered before recovery process
1. What is the data which needs to be recovered? 2. What type of hard drive is it? 3. How much data is on the hard drive? 4. What happened when the drive failed? 5. How fast do you need the data?
Recovering critical data is a specialized process that requires the right software, hardware and advanced techniques. In many failure-related cases, the chances of recovering data from a damaged hard drive range from 90-100%. If the electronic system is the only thing affected, then the drive can often be reused after the electronic control panel has been replaced. If, on the other hand, the defect is of a mechanical nature, then recovery will be a bit more difficult, which can be taken care at any Data Recovery Companies lab.
If it is problem related to the file system, which has caused inaccessibility of the data then it can be recovered using Data Recovery Software, an independent review has been posted on my website which lists the best in the field and helps you to identify the correct solution.
The first and most firm rule of thumb for preventing a loss of your data is to do complete and regular Hard Drive Backups! This is also the rule that most people do not bother to follow. Today, with a multitude of options for backing up your hard drive there really is no excuse for not doing so. Cheap and affordable USB hard drives can act as redundant storage for your computer, making copies of your entire hard disc drive with the push of a button. A flash drive itself can be used as a backup medium for smaller amounts of personal files as well.
On a regular basis every computer owner should run the Scandisk utility that is included with your Windows installation. Right click on your hard drive's icon, select Properties, select the Tools tab, and click on Error Checking. This utility scans your hard drive for areas that have corrupted information. Such sectors of bad data are often a prelude to a looming hard drive failure. If bad sectors are found you should immediately back up your data and consider replacing the drive in the future.
If your hard disc drive has shown the final warning signs of failure and will not allow your computer to boot you have very few options.
• If possible, backup your most important data immediately. • Disregard your program files and other software as it can be reinstalled from your original discs. • Save the data that cannot be replaced first.
If the computer has stopped working or refuses to boot up turn the computer off, unplug it, open it up, and carefully remove the hard disc drive from the case. Place the hard drive in a zippered freezer bag, seal it tightly while pressing out as much air as possible, and THROW IT IN THE FREEZER.
Leave the hard drive in the freezer for 24 hours. In the meantime, go to a working computer and download a shareware copy of Hard Drive Mechanic and install the software onto a blank floppy disk.
The next day, reinstall the hard drive as quickly as possible, boot the computer from the floppy disk you copied the Hard Drive Mechanic to, and start it up. With luck, the drive may continue to work long enough for you to backup your files, but the Hard Drive Mechanic software is there to help you should there be no other option left.
If your system has "crashed" and you can no longer access the operating system or see the drive in the BIOS, then shut the system down immediately and do not run any further power through the drive by attempting reboots. This is considered a physical problem with the drive and is an extremely sensitive issue. If the head stack inside your drive has been damaged, you may cause further additional damage to the platter/s of the drive, upon which your data is stored.
If you have deleted a file or files or accidentally formatted your drive, then the most important thing to remember is to NOT write or install ANY new information onto that drive. Deleting files simply removes the locating tag of the file, but the file is still intact on the drive. If you add new data to the drive, you may over-write your lost data; losing it forever. Using advanced software or contacting Data Recovery Expert can re-assemble the binary code and restore your files.
If your partition has become corrupted, the most important thing to remember is NOT to attempt a re-install of your operating system or add new data to the drive. Again, contact Data Recovery Expert to use specialized software and techniques to repair the partition and/or extract your data.
If you have deleted a partition, do not attempt to restore it by formatting the drive as this will only result in the addition of an empty partition. It will not recover your data.
If you experience a single file corruption, be sure not to attempt creating a new file with the same name as this will partially over-write the file and will greatly decrease our ability to recover fully.
Though computers are widely used not many people know what to do in the event of a computer breakdown. How you handle your data recovery process will determine whether information is salvaged or permanently lost. This procedure should ONLY be attempted by a Data Recovery Specialist.
Note: IF YOUR SYSTEM HARD DRIVE EMITS UNUSUAL NOISES (CLICKING, GRINDING OR METAL SCRAPING), TURN IT OFF IMMEDIATELY! This symptom typically indicates a head crash that can destroy your data. Hard drives spin with extreme speed; therefore, wide damage can occur in a short period of time. Contact Data Recovery Specialists immediately, as this situation demands professional recovery.
One of the ways by which a virus can infect your PC is through USB/Pen drives. Common viruses such as ’Ravmon’ , ‘New Folder.exe’, ‘Orkut is banned’ etc are spreading through USB drives. Most anti virus programs are unable to virus clean up and even if they do, in most cases they are unable to delete viruses, only quarantine it. Here are the things which you can do for virus protection of your USB Drive.
Whenever you plug a USB drive in your system, a window will appear similar to the one shown below
Don’t click on Ok , just choose ‘Cancel’. Open the Command Prompt by typing ‘cmd‘ in the run box. In the command prompt type the drive letter: and press enter . Now type dir /w/a and press enter. This will display a list of the files in the pen drive. Check whether the following files are there or not
• Autorun.inf • Ravmon.exe • New Folder.exe • svchost.exe • Heap41a • or any other exe file which may be suspicious.
If any of the above files are there, then probably the USB drive is infected. In command prompt type attrib -r -a -s -h *.* and press enter. This will remove the Read Only, Archive, System and hidden file attribute from all the files. Now just delete the files using the command del filename. example del Ravmon.exe. Delete all the files that are suspicious. To be on a safer side, just scan the USB drive with an anti virus program to check whether virus clean up is complete or not. Now remove the drive and plug it again. In most of the cases, the real culprit turns out to be the “Autorun.inf” file which mostly gets executed when someone clicks Ok in the dialog window which appears above. Thus the infections can spread
Security Tip
Disable the Autoplay feature of USB drives. If you disable the Autoplay feature of USB drives, then there are lesser chances of the virus spreading. A tool which can perform such a function is Tweak UI. Download it from here install it.
Run the program. Now you can disable the Autoplay feature of the removable drives as shown above. By following the above steps, you can keep yourUSBvirusprotected. Update: Tweak UI is a freeware software you can download it here: http://www.filehippo.com/download_tweakui/
If you like to increase, optimize your Hard Disk IO - readwrite speed without buying expensive software utilities to do that job or changing the HD, just follow next steps. With doing these steps you will increase Hard disk speed (depends of manufacture and specification, but its worth to try). The most speed improvement is visible with IDE drives; however there are reports that this tweak also does good for SCSI disks.
In any case, it won't harm your system, so try it yourself and let me know what you find!
Steps
1. Run SYSEDIT.EXE from the start & then Run command.
2. Expand the system.ini file window.
3. Scroll down almost to the end of the file untill you find a line called [386enh].
4. Press Enter to make one blank line, and in that line type
5. Irq14=4096 (note This line IS CASE SENSITIVE)
6. Click on the File menu, then choose Save.
7. Close SYSEDIT and reboot your computer.
8. Restart windows!
The speed improvement will be noticed just after the system reboots, any system info. software can be used to check the improvement.
Tags: disk management, partition, hard disk, hard disk drive, hdd, boot, disk editor, reorganize, diagnostic, windows, windows xp, winxp, win xp, tune-up, tweak, tips, free, download, software
Sometimes some of your friends who appear offline in yahoo messenger may not be actually offline, they may in the 'Invisible' mode. This maybe if they are trying to ignore you or are too busy to talk to anyone.
There is this small trick that you can use to find out what the truth is.
Firstly open your yahoo messenger main window and double click on the name of the person whom you want to check. The chat window will open obviously.
Click IMVironment button, select See all IMVironments, select Yahoo! Tools or Interactive Fun, and click on Doodle.
After loading the Doodle imvironment there can be two possibilities
1.If the user is offline Doodle are will show this waiting for your friend to load Doodle continuously .See in the picture below
2. If the user is online (but in invisible mode), after few seconds (it can take up to one minute, depending on your connection speed), you should get a blank page like in the picture below. So you know that the user is online.
Tags: Tags: voice change software, change voice, Real Time Voice Changer, Voice Morpher, Voice Disguise, Sound Effects, voice over ip, voice over internet, yahoo messenger tools, instant messaging software, voice changer software, voip software, yahoo messenger utilities,
Best tools to keep your Mac in best shape Mac OS X runs on a different file system (HFS, as opposed to Window’s NTFS) that automatically defragments and optimizes itself. So if you’re a Mac user, chances are you would never need to defragment your hard disk, thanks to Apple. However fragmentation is only one of the many problems we face regarding system optimization.Mac OS X is quite different from Windows. Installing programs for instance, only requires a simple drag-and-drop of the application from the DMG (image file) to the ‘Applications’ folder. Uninstalling is just as simple with a swift pull to Trash.
Optimizers
MainMenu
The simplest of the 4 here. MainMenu allows you to perform basic optimizing actions i.e. clearing system and application caches, repairing permissions and rebuilding Spotlight index.
Maintenance
With Maintenance, you’ll be able to clear system, application and font caches as well as old log files; repair permissions; and rebuild Spotlight and Mail indexes.
IceClean
Similar to MainMenu, IceClean offers a simple-to-use GUI but it is more capable than it looks. IceClean can update prebindings, repair permissions, do a system cleanup (clear cache, remove log files and temporary items), verify the system disk, and completely remove all .DS_store files (those are the files which OS X looks to to retrieve folder preferences e.g. icon view, size, window size and arrangement).
OnyX
OnyX is a bit more powerful. I’d say that it’s the most multi-functional of the lot. It is able to repair permissions; clear system, application and font caches, old log files and temporary items; it can also check the S.M.A.R.T status of your hard disk; and has a few personalization options as well.
Tags: Mac360, Apple, Mac, Mac News, Mac Software, Apple News, iMac, iMac news, Mac mini, MacBook, MacBook Pro, MacPro, PowerPC G5, Mac OS X, Mac OS X news
Check out the most significant architectural change in the x86 architecture in 13 years, the Intel Core i7. Intel has completely reinvented their CPU design, removing the antiquated Front Side Bus and replacing it with the new Intel Quick Path Interconnect, delivering up to 6.4 GT/s. Also new to the Core i7 line is the integrated memory controller, supporting Triple Channel DDR3 Memory allowing for more maximum memory, up to 24GB on some boards, and faster access times. Located directly on the CPU die is 256KB per core of L2 cache and 8MB L3 cache shared across all four cores means the CPU can do more without having to access the main memory, further increasing performance.
The Intel Core i7 processor is the latest in cutting edge processor technology for the desktop PC. Based on the new Intel Nehalem micro architecture, the Intel Core i7 processor delivers four complete execution cores within a single processor along with the rebirth of Intel Hyper Threading Technology, delivering unprecedented performance and responsiveness in multi-threaded and multi-tasking business and home use environments and the ability to simultaneously process up to 8 separate threads.
The unprecedented performance of the Intel Core i7 processor is made possible by each of the four complete execution cores delivering the full power of Intel Nehalem micro architecture. More instructions can be carried out per clock cycle, shorter and wider pipelines execute commands more quickly, and improved bus lanes move data throughout the system faster. This quad-core, eight-thread processor represents Intel’s continued leadership and drive of multi-core processing and more parallel computing.
Doing More with Intel Quad-Core
The Intel Core i7 processor is at the center of todays most interactive and content rich software experiences. The evolving set of threaded multi-media applications, including digital content creation, will shine as users are able to complete tasks faster. Game play can achieve even greater visualization and realism as tasks such as artificial intelligence (AI), physics, and rendering can be distributed across each of the four complete execution cores and run in parallel.
Search for any celebrity (For e.g. Jessica alba) (As shown Above)
Step 3
Add &imgtype=face to the address bar as marked below & press enter
Step 4
It show only images containing faces as you can see below
Tags: google tricks,search tricks,Google search tricks,google search cheats,top 10 google searches,best google search tricks,amazing google tricks,google search tips