
Showing posts with label Antivirus. Show all posts
Showing posts with label Antivirus. Show all posts
Wednesday, December 1, 2010

Friday, April 17, 2009
Virus Protection : How to remove Boot.com Virus from Hard Drives
Virus Protection : How to remove Boot.com Virus from Hard Drives
boot.com is a virus which attacks the hard drives & the hard drives could not be opened by double clicking. Most anti virus programs are unable to virus clean up and even if they do, in most cases they are unable to delete viruses, only quarantine it. Here are some steps which can help you out to remove boot.com virus from your hard drives.
In hard drives after enabling viewing hidden file u can see some autorun file & a file named boot.com which cannot be removed just by deleting.
Here’s the REAL way to clean this off your system.
You should do these steps after a rebooting computer in safe mode.
1) Navigate to the problem drive(s) via the Explore option.
2) Click on TOOLS - FOLDER OPTIONS
3) Click the button which says ‘Show hidden files and folders.
4) UNCHECK the following boxes
Hide extensions for known file types
Hide protected operating system files
5) Find and delete the autorun.ini file and the recycled folder on the root directory of all virus infected drives.
6) Check “c:\windows\system32\dllcache” for boot.com virus file and delete it if present.
7) Check “c:\windows\prefetch” for boot.com file and delete if present.
8) Delete all files from c:\windows\temp
(Some files may not delete, that’s OK, they’re in use by the system and not virus files.)
9) Delete all files from c:\Documents and Settings\[USER PROFILE]\Local Settings\Temp
(Again, a couple files may not delete, don’t worry.)
10) Run Regedit
11) Make sure you are at the very first entry of the registry hive.
(My Computer should be highlighted) then click EDIT - FIND
12) Search for “boot.com”. If it finds an entry, delete it. Keep hitting F3 until you’ve deleted all instances of boot.com in the entire registry.
13) Scroll the left column back up to the top and highlight the My Computer again at the top of the registry hive.
14) Click Edit - Find again and search for ‘recycled’ and repeat as in step 13, deleting the entries as it finds them.
15) Close registry editor and try opening the infected drives.
Now You are Done kindly let me know if you are still having some problem.
Monday, February 23, 2009
Virus Protection : How to remove Virus from USB Drives
One of the ways by which a virus can infect your PC is through USB/Pen drives. Common viruses such as ’Ravmon’ , ‘New Folder.exe’, ‘Orkut is banned’ etc are spreading through USB drives. Most anti virus programs are unable to virus clean up and even if they do, in most cases they are unable to delete viruses, only quarantine it. Here are the things which you can do for virus protection of your USB Drive.
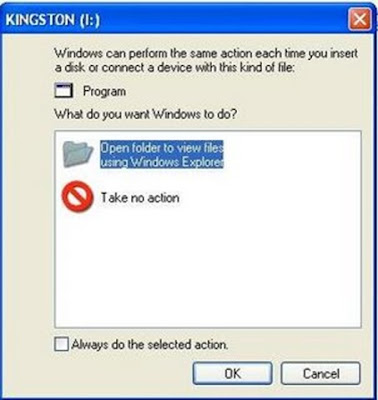
Whenever you plug a USB drive in your system, a window will appear similar to the one shown below
Virus Protections Trick
Don’t click on Ok , just choose ‘Cancel’. Open the Command Prompt by typing ‘cmd‘ in the run box. In the command prompt type the drive letter: and press enter . Now type dir /w/a and press enter.
This will display a list of the files in the pen drive. Check whether the following files are there or not
• Autorun.inf
• Ravmon.exe
• New Folder.exe
• svchost.exe
• Heap41a
• or any other exe file which may be suspicious.
If any of the above files are there, then probably the USB drive is infected. In command prompt type attrib -r -a -s -h *.* and press enter. This will remove the Read Only, Archive, System and hidden file attribute from all the files. Now just delete the files using the command del filename. example del Ravmon.exe. Delete all the files that are suspicious. To be on a safer side, just scan the USB drive with an anti virus program to check whether virus clean up is complete or not. Now remove the drive and plug it again. In most of the cases, the real culprit turns out to be the “Autorun.inf” file which mostly gets executed when someone clicks Ok in the dialog window which appears above. Thus the infections can spread
Security Tip
Disable the Autoplay feature of USB drives. If you disable the Autoplay feature of USB drives, then there are lesser chances of the virus spreading. A tool which can perform such a function is Tweak UI. Download it from here install it.
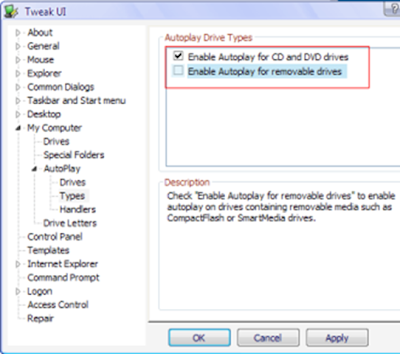
Run the program. Now you can disable the Autoplay feature of the removable drives as shown above. By following the above steps, you can keep your USB virus protected.
Update: Tweak UI is a freeware software you can download it here: http://www.filehippo.com/download_tweakui/
Whenever you plug a USB drive in your system, a window will appear similar to the one shown below

Virus Protections Trick
Don’t click on Ok , just choose ‘Cancel’. Open the Command Prompt by typing ‘cmd‘ in the run box. In the command prompt type the drive letter: and press enter . Now type dir /w/a and press enter.
This will display a list of the files in the pen drive. Check whether the following files are there or not
• Autorun.inf
• Ravmon.exe
• New Folder.exe
• svchost.exe
• Heap41a
• or any other exe file which may be suspicious.
If any of the above files are there, then probably the USB drive is infected. In command prompt type attrib -r -a -s -h *.* and press enter. This will remove the Read Only, Archive, System and hidden file attribute from all the files. Now just delete the files using the command del filename. example del Ravmon.exe. Delete all the files that are suspicious. To be on a safer side, just scan the USB drive with an anti virus program to check whether virus clean up is complete or not. Now remove the drive and plug it again. In most of the cases, the real culprit turns out to be the “Autorun.inf” file which mostly gets executed when someone clicks Ok in the dialog window which appears above. Thus the infections can spread
Security Tip
Disable the Autoplay feature of USB drives. If you disable the Autoplay feature of USB drives, then there are lesser chances of the virus spreading. A tool which can perform such a function is Tweak UI. Download it from here install it.

Run the program. Now you can disable the Autoplay feature of the removable drives as shown above. By following the above steps, you can keep your USB virus protected.
Update: Tweak UI is a freeware software you can download it here: http://www.filehippo.com/download_tweakui/
Subscribe to:
Posts (Atom)